Choose materials for a useful little weave
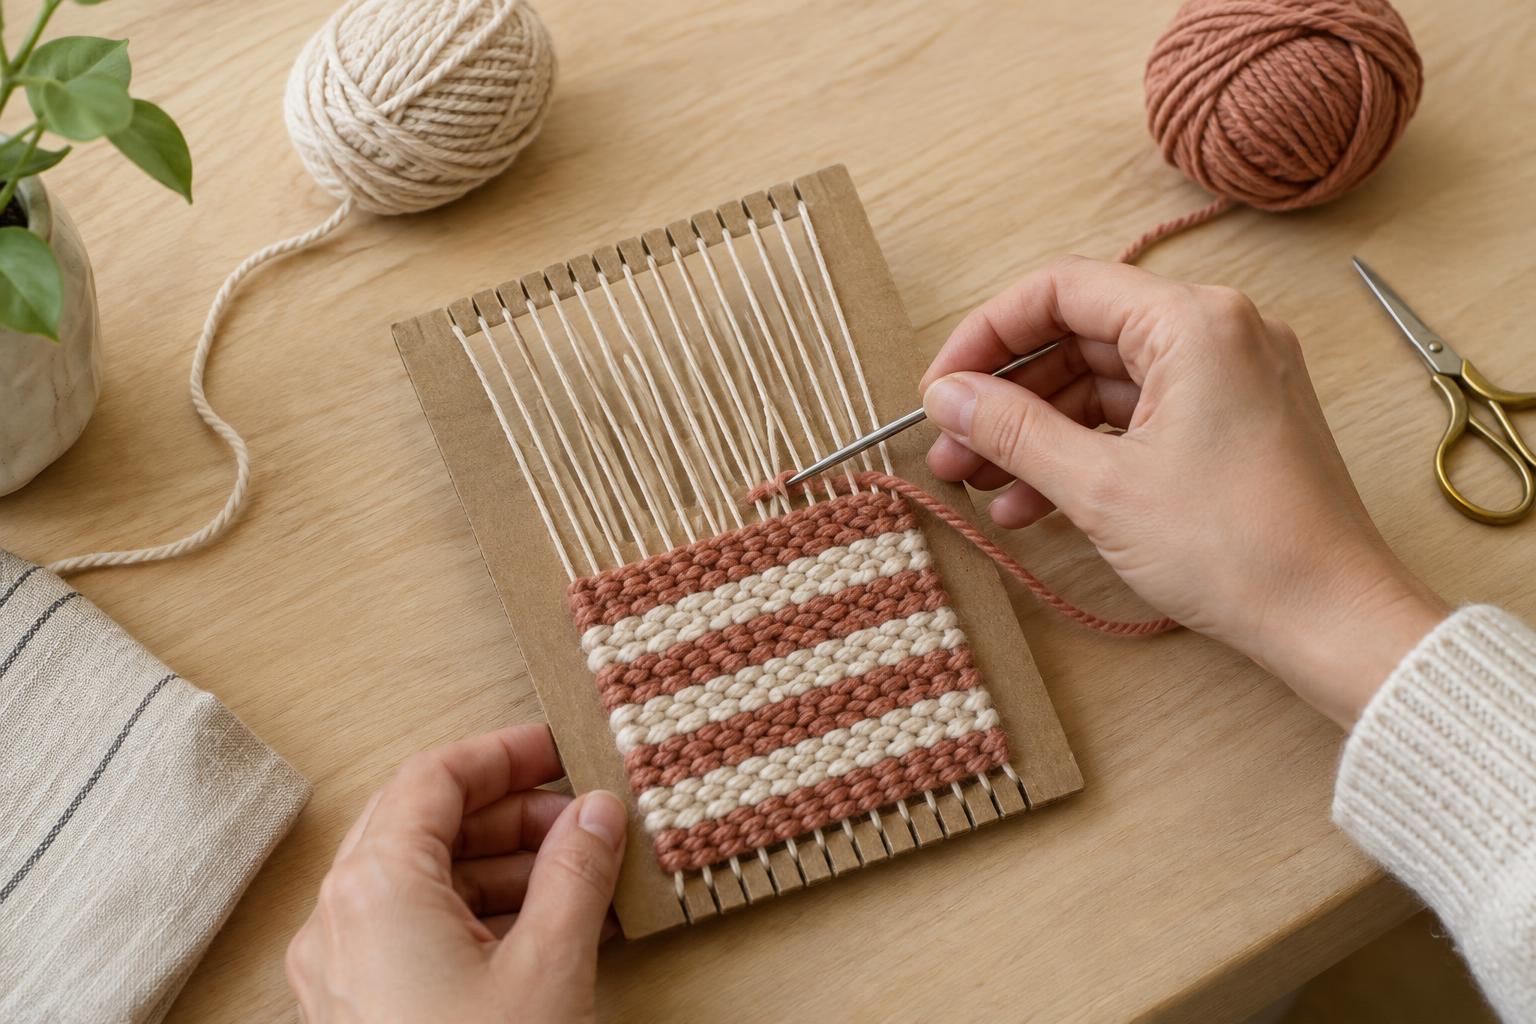
A cardboard loom is an approachable way to try weaving without buying equipment. The cardboard holds a set of vertical threads, called the warp, while you pass another thread, called the weft, across them. For a first project, aim for a coaster about 9 to 10 centimetres square. Its small size makes it easy to see how each row affects the shape.
Gather a firm piece of cardboard about 14 centimetres square, cotton yarn or cotton string, scissors, a ruler, tape and a blunt yarn needle. A comb or fork is helpful for settling the rows. Cotton is a practical choice for a coaster because it is washable and tends to lie fairly flat. Avoid very bulky yarn for your first attempt: thick rows can make it harder to keep the edges straight. You can use one colour throughout or choose a second colour for a simple stripe.
Set up the cardboard loom
Mark ten evenly spaced points, roughly 1 centimetre apart, along the centre of the cardboard’s top edge. Mark matching points on the bottom edge. Cut a shallow notch at each mark, just deep enough to keep a strand from sliding sideways. Keep the notches away from the corners so the cardboard remains sturdy.
Cut ten warp strands, each about 30 centimetres long. Place one strand in each pair of matching top and bottom notches so it runs straight down the front of the cardboard. Leave roughly equal lengths extending beyond the top and bottom, then secure those loose ends to the back with tape. The strands should be taut enough to stay in place but not so tight that the cardboard bows. Check that they remain parallel; uneven spacing now will be more noticeable in the finished coaster.
Weave the body of the coaster
Thread the needle with a comfortable length of weft yarn, around an arm’s length. Begin about 2 centimetres below the top notches. Pass the needle over the first warp strand, under the second, and continue alternating to the far side. Leave a short tail at the starting edge; you will tuck it into the weave later. Do not pull the weft tight across the warp. Instead, leave it slightly loose, then gently press the row into place.
Turn around the outermost warp strand and work back in the opposite pattern: go under any strand you went over on the previous row, and over any you went under. Continue turning at the edges and alternating the pattern on every row. After a few passes, use your fingers, a comb or a fork to nudge the rows together. Pack them firmly enough that the warp is mostly covered, without forcing the fabric into a stiff ridge.
Pause occasionally to look at the outline. If the sides draw inward, the weft is probably being pulled too tightly; allow a little more yarn across the next row. If the edges flare outward, make your turns neater rather than tugging on completed rows. To add a stripe, leave a short tail from the first colour, start a new length at the edge and weave the new colour in the same over-under sequence. Continue until the woven area is approximately as tall as it is wide, leaving some exposed warp below it for finishing.
Remove the coaster and secure the ends
Before taking the work off the loom, use the needle to tuck each weft tail through several nearby rows on the back of the fabric. Release the tape and lift the warp strands out of the notches, taking care not to pull the woven rows apart. At the top edge, tie adjacent warp ends together in pairs with snug overhand knots close to the weave. Repeat along the bottom edge. With ten warp strands, you will have five knots on each end.
Trim the warp ends to make an even fringe, or leave them longer if you prefer a softer look. Gently straighten the coaster with your hands. If the yarn’s care instructions allow it, a light dampening followed by drying flat can help the weave settle. Do not stretch it while wet; simply ease the corners into shape.
Make the next one your own
Once you have made one coaster, small changes can give the next a different character. Try two narrow stripes near opposite ends, alternate colours every few rows, or pair a natural warp with a darker weft. Keep the same yarn thickness and loom spacing while experimenting so you can see what the colour changes do without also changing the fabric’s density.
A handwoven coaster may not be perfectly square, and that is part of learning to control tension. What matters most is that it lies reasonably flat and has secure edges. Let it dry fully after spills, and follow the yarn’s washing guidance when it needs cleaning. The cardboard loom can be reused until its notches become worn; by then, you will have a good sense of how a few simple threads become a useful piece of homeware.